How to rig a slip sinker for river fishing
There’s nothing quite as frustrating as feeling a subtle tug on your line, setting the hook, and coming up empty-handed. Often, the culprit isn't your bait or your skill, but your rig. When you're fishing rivers in Oregon, especially for those elusive salmon, steelhead, or even bottom-dwelling sturgeon, a traditional fixed sinker can sometimes spook the fish or make it hard to detect those delicate bites. This guide will walk you through everything you need to know about rigging a slip sinker for river fishing, ensuring your bait presents naturally and you feel every nibble.
Understanding the Magic of the Slip Sinker in River Fishing
River fishing presents a unique set of challenges compared to still water. Currents, snags, and the need for a natural bait presentation all demand specific rigging approaches. The slip sinker rig stands out as a highly effective and versatile option, particularly for targeting species that can be finicky eaters or those that need time to fully take the bait.
Why a Slip Sinker? The Freedom to Feel the Bite
Imagine your bait tumbling naturally along the riverbed, mimicking a dislodged insect or a piece of roe floating downstream. That's the primary advantage of a slip sinker rig. Unlike a fixed sinker, which is crimped directly onto your line, a slip sinker has a hole through its center, allowing it to slide freely up and down your main line. What does this mean for you, the angler?
Firstly, when a fish takes your bait, it can swim off a short distance without immediately feeling the full weight of the sinker. This subtle difference often leads to a more confident bite, giving the fish more time to ingest the bait before it senses resistance. You'll feel that characteristic "thump" or sustained pull directly, rather than the muted sensation often transmitted through a fixed weight. This direct connection to the fish, unimpeded by the sinker's weight, dramatically increases your bite detection, which is crucial when fishing for wary species like Oregon Steelhead Fishing Techniques or Oregon Salmon Fishing Techniques.
Secondly, the slip sinker allows your bait to move independently of the weight, especially in current. Your bait can drift, tumble, or gently settle into pockets behind rocks while the sinker holds position, making it appear much more natural to a passing fish. This separation prevents your bait from being unnaturally pinned to the bottom, which can be a dead giveaway to wary fish that something isn't quite right.
When to Choose a Slip Sinker Rig
The slip sinker rig shines in several specific river fishing scenarios. It's truly a fantastic all-around setup that every river angler in Oregon should have in their arsenal.
You'll want to reach for a slip sinker when:
- Drift Fishing in Current: This is arguably where the slip sinker excels. Whether you're targeting steelhead in a riffle or salmon in a deep run, allowing your bait to drift naturally with the current is key. The slip sinker allows your line to move freely, minimizing drag on your bait and letting it present in a lifelike manner. This is particularly effective when trying to cover varied depths and structures as your bait tumbles downstream.
- Targeting Bottom Feeders: Species like sturgeon or catfish often hug the bottom. A slip sinker rig allows your bait to rest directly on the riverbed while the sinker holds it in place, preventing it from being swept away. When a sturgeon gently mouths the bait, the line slips through the sinker, and they don't feel the weight, often leading to a stronger, more committed take. How to fish for sturgeon on the Columbia River is a perfect scenario for this rig.
- Fishing in Variable Depths: As your boat or position moves, or as the river bottom changes, a slip sinker rig adapts better than a fixed weight. The line can pay out through the sinker more freely, keeping your bait closer to the desired depth without constantly adjusting your weight or reeling in.
- When Fish are Finicky: Sometimes fish are just not aggressively biting. If you're getting short strikes or subtle taps, a slip sinker's ability to offer less resistance can make the difference between a missed fish and a landed one. The less resistance they feel, the longer they'll hold onto your offering. This is often the case when pursuing Oregon Trout Species Guide in pressured waters.
Gearing Up: What You'll Need for Your Slip Sinker Rig
Before you can rig up, you need the right components. Fortunately, most of what you'll need is standard fishing tackle, easily found at local tackle shops or online retailers like Amazon. Having these basics on hand will ensure you're ready for any river adventure.
Rod, Reel, and Line: The Foundation
Your choice of rod, reel, and line forms the backbone of your slip sinker setup. The key is to match them to the size of fish you're targeting and the river conditions you expect.
- Rod: For river fishing with a slip sinker, especially for salmon and steelhead, a medium to medium-heavy action rod, typically 8 to 10 feet in length, is ideal. The longer rod provides better line control, helps with mending your line in current, and offers more leverage for casting and fighting powerful fish. A softer tip will also help you detect those subtle bites without immediately spooking the fish. For heavier applications, like sturgeon fishing, you might opt for a much stiffer, shorter rod with a lot of backbone.
- Reel: A reliable baitcasting reel is often preferred for river fishing, as it offers excellent casting control and power. However, a good spinning reel can also work, especially for lighter presentations or if you prefer its ease of use. Ensure your reel has a smooth drag system, which is paramount for fighting strong fish and preventing line breaks, especially with lighter leaders.
- Main Line: Monofilament or braided line can both work. Braided line, with its near-zero stretch, offers superior bite detection, which pairs perfectly with the slip sinker's design. It also has a smaller diameter for its breaking strength, cutting through the water better. If you choose braid, consider a high-visibility color so you can easily see your line drift and detect subtle movements. Monofilament offers more stretch, which can act as a shock absorber, and is often preferred in snaggy environments due to its abrasion resistance. A common setup might be 20-30 lb braided main line. You can find a wide selection of braided lines on Amazon to suit your needs.
Selecting Your Slip Sinker and Other Terminal Tackle
This is where the "slip" in slip sinker comes into play, along with the components that make it all work seamlessly.
- Slip Sinkers: These come in various shapes and weights.
- Egg Sinkers: Oval-shaped with a hole through the middle, these are popular for their smooth, snag-resistant profile. They tend to roll easily on the bottom, which can be good for natural drift but might also get hung up in rocky areas.
- Bullet Sinkers: Cone-shaped, these are great for penetrating cover and reducing snags, especially in weedy areas. Less common in heavy river currents for primary weight, but useful for lighter applications.
- Flat/Pyramid Sinkers: While some variations exist that can "slip," traditional pyramid sinkers are usually fixed. However, specialized pyramid-shaped slip sinkers are available that excel at holding bottom in strong currents due to their flat sides and pointed design. Choose a weight heavy enough to hold your bait near the bottom without excessive line drag, but not so heavy that it constantly snags. River conditions, current speed, and depth will dictate the necessary weight. Always carry an assortment!
- Swivels: You'll need a good quality barrel swivel or, even better, a Sampo or SPRO swivel. The swivel serves two crucial purposes: first, it prevents your slip sinker from sliding down to your hook, creating a break point in the rig; second, it helps prevent line twist, especially when drifting or using spinning lures. Match the swivel size to your line strength; it should be strong enough to handle your target fish but small enough to pass through your sinker if you choose a very small sinker size for lighter fishing.
- Leader Material: Monofilament or fluorocarbon leader is essential. Fluorocarbon is nearly invisible underwater and has excellent abrasion resistance, making it ideal for clear river conditions and toothy fish. Monofilament is more budget-friendly and offers good knot strength. The leader should be lighter than your main line (e.g., 10-20 lb test for a 30 lb main line). This creates a "fuse" – if you get snagged, only your leader and hook break off, not your entire rig. The length of your leader can vary depending on conditions and species; often, 18-36 inches is a good starting point. Many anglers prefer a good fluorocarbon leader, readily available on Amazon, for its stealth and durability.
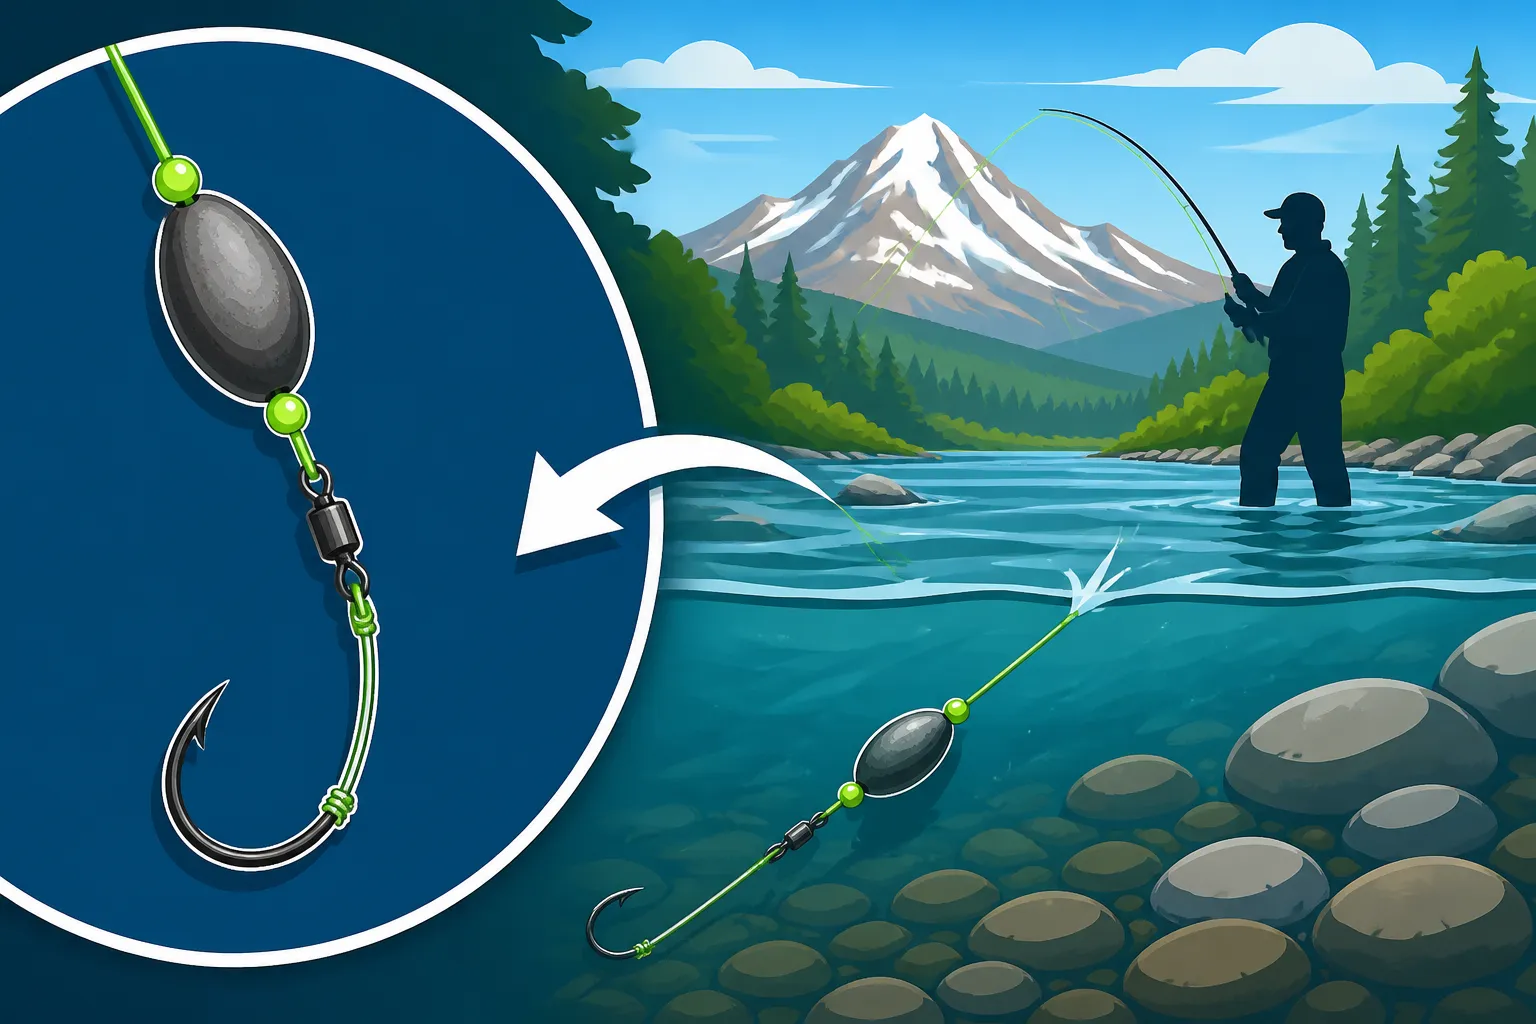
- Leader Stop/Bead (Optional but Recommended): Some anglers add a small plastic bead between the slip sinker and the swivel. This acts as a buffer, protecting your knot on the swivel from the constant banging of the sinker in heavy current. While not strictly necessary, it can add longevity to your rig.
Bait and Hooks: Matching the Hatch (or the Stock)
The beauty of a slip sinker rig is its versatility, allowing for a wide array of baits.
- Hooks: The type and size of hook depend entirely on your bait and target species.
- Single Hooks: Often preferred for bait fishing with roe, worms, or prawns. Sizes typically range from 1/0 to 5/0, depending on the bait size and mouth size of the fish. Check regulations for specific hook requirements (e.g., barbless hooks for steelhead in certain areas).
- Treble Hooks: Less common with slip sinker bait rigs due to regulations and potential harm to fish, but might be used if targeting species that readily strike lures.
- Jig Heads: A slip sinker can precede a jig, allowing the jig to tumble freely. This is especially effective for smallmouth bass or trout.
- Bait:
- Cured Roe/Eggs: Salmon and steelhead eggs are incredibly effective for their respective species. The natural drift provided by the slip sinker makes this presentation irresistible.
- Worms/Nightcrawlers: A classic for trout, bass, and many other freshwater species. Fished on a single hook, the natural movement is key.
- Prawns/Shrimp: Another go-to for salmon and steelhead, often tipped with a piece of roe or scent.
- Scented Soft Plastics/Artificial Baits: Many anglers combine the natural drift of a slip sinker with scented soft plastic worms, beads, or small paddle tails, especially for trout or bass. Brands like Berkley PowerBait or Gulp! often produce fantastic results and are easy to rig.
- Live Bait: Minnows or other small baitfish can be devastating on a slip sinker rig for species like bass or larger trout. Ensure you are familiar with Oregon Fishing Regulations Explained regarding live bait use.
Step-by-Step Rigging: Building Your Slip Sinker Setup
Now that you have all your components, let's put it all together. This is a straightforward rig, and with a little practice, you'll be tying it up in no time, even in chilly Oregon weather.
The Mainline and Stopper Knot Setup
This first step is crucial because it defines the limit of your sinker's travel and creates the foundation for your leader.
-
Thread Your Main Line Through the Sinker: Take your main fishing line (braid or mono) directly from your reel and thread it through the hole in your chosen slip sinker. Make sure the line passes smoothly through the sinker. The sinker should slide freely up and down the line.
-
Tie a Stopper Knot (Optional but Recommended): While your swivel will act as the primary stop for the sinker, adding a stopper knot above the sinker can serve several purposes. It can limit how far up the line the sinker slides during a cast (preventing it from hitting your rod tip guides), or it can be used to set a maximum depth for your bait to sink if you want it to float a bit off the bottom. You can use a specific "slip knot" material, often called "stopper knot material" or "bobber stops," which are small pieces of string that cinch down on your line but can be moved. Alternatively, a simple double overhand knot with a piece of heavier mono (or even another piece of your main line if it's braided) can work. The key is that it's tight enough to stop the sinker but can be adjusted if needed.
- Pro Tip: For a permanent stopper, you can also use a small crimp sleeve, but be careful not to damage your main line. For most applications, letting the sinker slide freely until it hits the swivel is the goal, so a stopper knot above the sinker is less common than the swivel below it. The main focus here is simply threading the sinker onto the line.
Adding the Sinker and Swivel
This is the core junction of your rig, where the magic of the slip sinker truly happens.
- Slide the Sinker Up: Once the sinker is on your main line, slide it up a foot or two from the end of your line. This gives you plenty of working room for the next step.
- Tie on Your Swivel: Take the free end of your main line and tie it directly to one end of your barrel swivel (or preferred type of swivel). Use a strong, reliable fishing knot like a Palomar knot, improved clinch knot, or Uni knot. Make sure to moisten your knot before cinching it down tightly to ensure maximum strength. Trim any excess tag end cleanly. This swivel is critical because it will stop your slip sinker from sliding any further down your line, thus creating the "slip" action.
- Remember: The sinker should now be able to slide freely up and down your main line, stopping at the knot tied to the swivel. If you used a bead in the previous step, it would sit just above this knot, protecting it.
Attaching Your Leader and Hook
This final step connects your bait to the business end of the rig, completing your setup.
- Attach Your Leader: Take your pre-tied leader (which should have a hook or jig already attached, or be ready for one) and tie one end to the other eye of your swivel. Again, use a strong, reliable knot like a Palomar or improved clinch. The length of this leader can vary, but generally, 18 to 36 inches is a good starting point for many river applications. A longer leader allows your bait to drift more naturally and further away from the disturbance of the sinker, which is often beneficial in clear water or when fish are skittish.
- Why a leader? Besides invisibility and abrasion resistance, the leader acts as a sacrificial line. If your hook gets hopelessly snagged on the bottom, you're more likely to break off just the leader and hook, saving your more expensive main line and slip sinker. This is particularly useful in snag-prone Best Rivers to Fish in Oregon.
- Attach Your Hook/Jig and Bait: If your hook or jig isn't already tied to your leader, now's the time. Use another strong knot to secure it. Then, carefully bait your hook with your chosen offering—whether it's a juicy glob of salmon roe, a wriggling nightcrawler, or a scented plastic grub.
- Final Check: Give everything a gentle tug to ensure all knots are secure. Make sure the slip sinker moves freely on your main line between the rod tip and the swivel. You're now ready to fish!
Here's a quick summary table for your slip sinker rig components:
| Component | Purpose | Key Considerations |
|---|---|---|
| Slip Sinker | Gets bait to the bottom, allows natural drift, minimal resistance. | Weight (match current/depth), Shape (egg, pyramid for grip). |
| Main Line | Connects reel to the rig. | Braided (sensitivity) or Mono (stretch/abrasion). |
| Swivel | Stops sinker, prevents line twist, connects main line to leader. | Strong, appropriate size for line, barrel or SPRO type. |
| Leader Line | Connects swivel to hook, adds stealth/abrasion resistance. | Fluorocarbon (invisible) or Mono, lighter than main line. |
| Hook/Jig | Holds bait, hooks fish. | Size (match bait/fish), type (single, barbless if required). |
| Bait | Attracts fish. | Natural (roe, worms) or Artificial (plastics, beads). |
Mastering the Slip Sinker: Techniques for Oregon Rivers
Rigging is only half the battle. Knowing how to effectively fish your slip sinker rig in the diverse environments of Oregon's rivers is what truly brings success. It's about presentation, patience, and paying attention to what the river is telling you.
Reading the River and Presenting Your Bait
Understanding where fish hold and how the current moves is paramount, especially when using a drift-focused rig. A slip sinker allows for a very natural presentation, but you have to put it in the right place.
- Identify Holding Water: Look for seams where fast current meets slower water, deeper pools, current breaks behind large rocks or logs, and submerged structure. These are prime locations where fish will hold out of the main current to conserve energy, waiting for food to drift by. How to find holding water for steelhead is a crucial skill to develop.
- Upstream Casts: For a natural drift, cast slightly upstream and across the current. This allows your sinker and bait to sink and begin drifting downstream before it reaches the target zone. As your rig drifts, maintain a slight bow in your line—just enough to keep tension and feel bites, but not so much that you create drag and pull your bait unnaturally.
- Mending Your Line: This is a key technique in river fishing. As your line drifts downstream, the current can create a large "belly" in your line, pulling your bait faster than the natural current speed or creating too much drag. To counteract this, lift your rod tip and "mend" the line by flipping it upstream, taking out the belly. This keeps your line relatively straight to your bait, ensuring a natural drift and better bite detection. Practicing mending will significantly improve your success with a slip sinker. Pay attention to How river flow affects steelhead fishing as strong currents will require more aggressive mending.
- Feeling the Bottom: With a slip sinker, you want to feel your sinker occasionally ticking along the bottom. This tells you that you're in the strike zone. If you're not feeling the bottom, your sinker might be too light, or your presentation is too high in the water column. If you're constantly snagging, your sinker might be too heavy or you're fishing in overly rocky terrain. It's a delicate balance.
Detecting Bites and Setting the Hook
The freedom of the slip sinker means fish don't feel immediate resistance, but it also means you might need to be attuned to more subtle indicators of a bite.
- Visual Cues: Watch your line where it enters the water. Any sudden twitch, stop, or unnatural movement could indicate a bite. If you're using high-visibility braided line, these visual cues become even more pronounced. This is especially true when pursuing Oregon Salmon Species Guide which can often take the bait very softly.
- Feeling the Tap: With braided line, you'll often feel distinct "taps" or "thumps" as the fish mouths the bait. Unlike a fixed weight, where the fish might feel the full weight and drop the bait quickly, with a slip sinker, you're directly connected to the bite through the line.
- The Pull: Sometimes, especially with more aggressive fish, you'll feel a sustained pull or a solid tug that leaves no doubt. This is the moment you've been waiting for.
- Setting the Hook: Once you detect a bite, reel up any slack immediately and then set the hook with a firm, upward sweep of your rod. Avoid a huge, violent jerk, as this can often pull the hook out of the fish's mouth. The goal is to drive the hook point home. With the no-stretch properties of braided line, a moderate sweep is often all it takes.
Common Challenges and Troubleshooting
Even with the perfect rig, river fishing can throw curveballs. Here are a few common issues and how to tackle them:
- Snags: Rivers are full of underwater obstacles. If you're constantly snagging, first, try a lighter sinker that allows for more movement over obstacles. Second, adjust your casting angle or drift path to avoid known snag zones. Sometimes, using a "slinky" type sinker (a piece of rope filled with lead shot, covered in fabric) can reduce snags as it's more flexible. Remember, your lighter leader is your friend here – it should break before your main line.
- Not Feeling the Bottom: Your sinker is too light for the current. Increase the weight of your slip sinker until you can feel it occasionally ticking the riverbed. Too much current can also make it hard for lighter line to get down, so consider using a slightly heavier main line if possible.
- Too Much Drag: Your bait is swinging too fast or unnaturally. This is often due to a large belly in your line created by the current. Practice more aggressive line mending to keep your line as straight as possible from your rod tip to your sinker. Also, ensure your sinker is heavy enough to hold the bottom effectively; a light sinker will just get swept along.
- Short Strikes/Subtle Bites: If fish are just nipping at your bait and not committing, try a longer leader to give your bait even more freedom and distance from the sinker. Also, experiment with smaller hooks or different bait presentations. Sometimes, a very subtle jigging motion (tiny lifts and drops of the rod tip) can entice a hesitant fish. Using a highly visible braided main line can help you detect these subtle bites visually before you even feel them.
Mastering the slip sinker rig will undoubtedly elevate your river fishing game in Oregon. It's a simple yet highly effective setup that gives your bait the natural presentation it needs to entice even the most wary fish. With the right gear, careful rigging, and an understanding of river dynamics, you'll be well on your way to more hook-ups and memorable days on the water.
Disclaimer
This article is for general informational purposes only and does not constitute professional advice. Laws, prices and regulations vary by location and change over time. Consult a qualified professional for guidance on your specific situation.