How to identify a razor clam hole on the beach
Oh, the thrill of razor clamming on the Oregon coast! There’s nothing quite like it, is there? The crisp ocean air, the vast expanse of sand, and that undeniable hunt for the elusive razor clam. But let’s be real, for many folks, especially those just starting out or only getting to the beach a couple of times a year, actually finding those clams can feel like trying to spot a needle in a haystack. You’ve got your clam gun or shovel, your bucket, and all the enthusiasm in the world, but if you don’t know what you’re looking for, you might end up with an empty pail and a lot of questions. This guide is all about demystifying the art of spotting razor clam holes, giving you the insider tips and tricks to turn those hopeful beach walks into successful clam digs.
Understanding the Elusive Razor Clam and Its Habitat
Before we dive into the nitty-gritty of spotting those tell-tale holes, it really helps to understand a bit about the razor clam itself and where it likes to hang out. These aren't your typical bay clams; they're streamlined, fast, and burrow surprisingly deep. They live in those expansive, sandy beaches of the Pacific Northwest, constantly shifting with the tides and sand. Knowing this foundation will greatly improve your chances, because you'll understand why they leave the signs they do.
Why Spotting the "Show" is Crucial
You might be thinking, "Can't I just dig anywhere on the beach?" Well, you could, but you'd be doing a whole lot of digging for potentially zero clams, and that's just plain exhausting. Razor clams, true to their name, are quite adept at disappearing into the sand. Unlike some other clam species that might be found by simply sifting through the top layers, razor clams require a direct hit. You need to know almost exactly where they are before you start digging, because once you disturb the sand above them, they'll use their powerful foot to burrow down faster than you can blink. This is why learning to identify their "show"—the unique mark they leave on the surface—is the absolute cornerstone of successful razor clamming. It’s the difference between a frustrating workout and a rewarding harvest. It's truly your treasure map!
The Anatomy of a Razor Clam "Show"
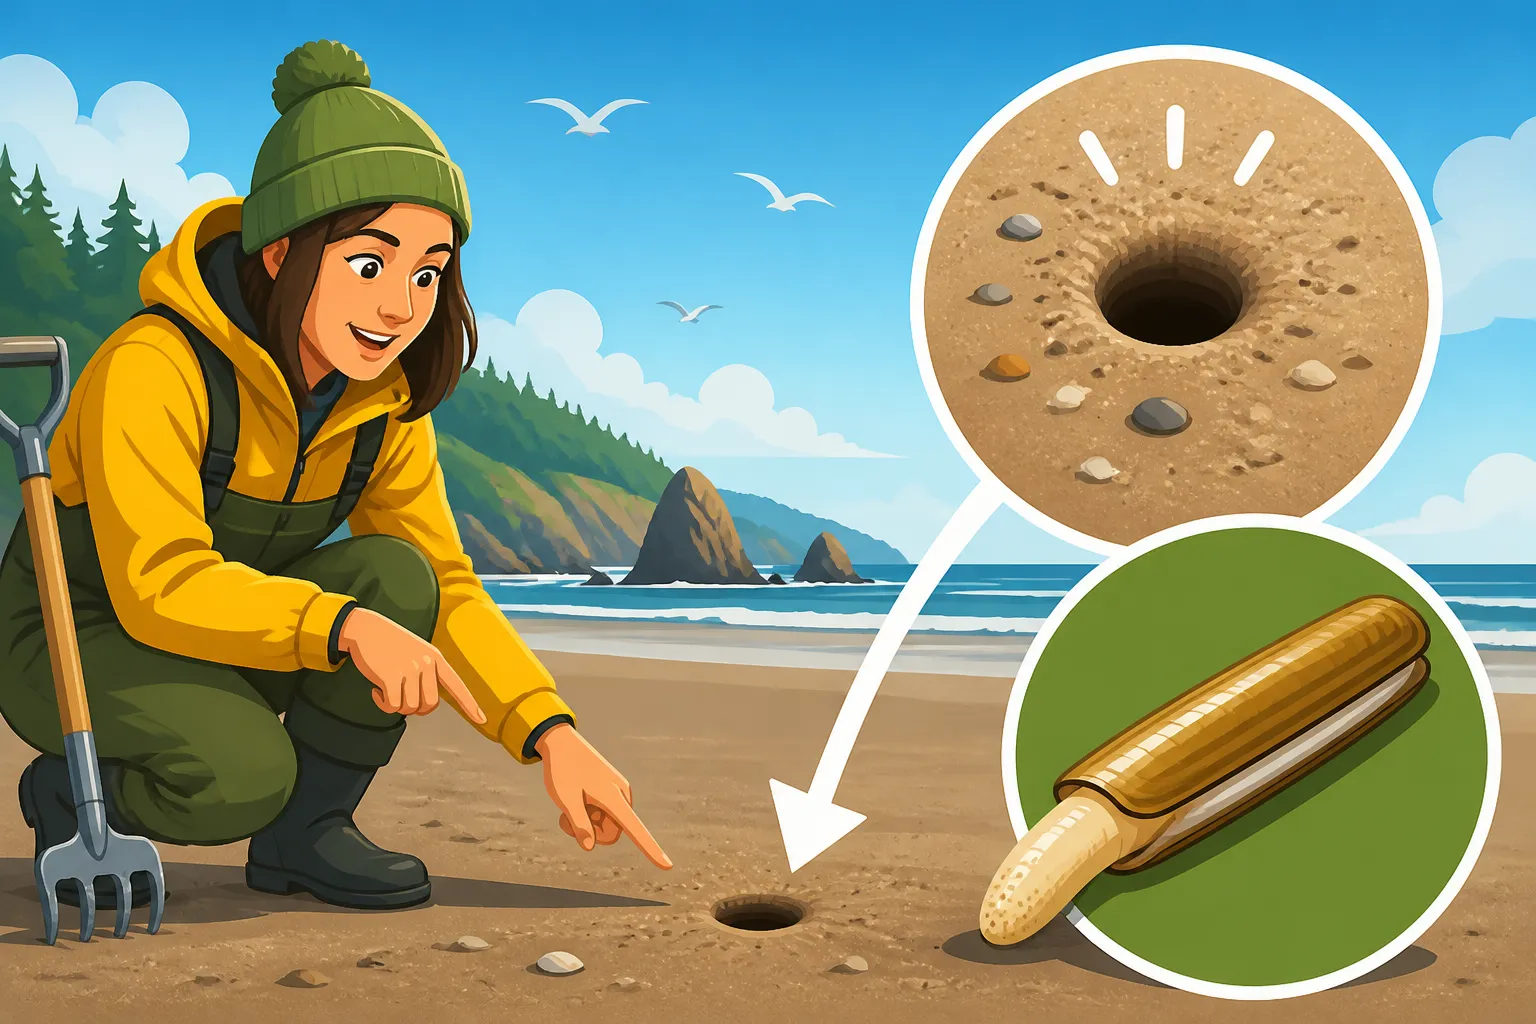
So, what exactly are you looking for? Forget those cartoon depictions of clams with their necks sticking way out. Razor clams are much subtler. Their "show" on the sand surface is primarily caused by their siphon, which is how they breathe and feed. When the tide goes out, and the sand compacts a bit, these clams, which are usually about 6 to 18 inches below the surface, will push their siphon up towards the surface to access water.
Here’s what that "show" typically looks like:
- A Small, Indented Dimple: This is the most common and often the clearest sign. It's usually a small, round or oval depression in the sand, sometimes with a tiny mound of sand around it. Think of it like a little pucker mark on the wet sand. The size can vary, but generally, it's about the size of a dime to a quarter, maybe a bit larger for bigger clams.
- A "Doughnut" or "Keyhole" Shape: Sometimes, especially in softer sand or when a clam is closer to the surface, the siphon might create a tiny ring of sand or a "keyhole" shape rather than just a simple dimple. This indicates the clam has been actively feeding or moving just below the surface.
- A Slight Rise or Pimple: Less common, but still a sign, is a very subtle bump or pimple in the sand. This might happen if the clam has just moved or expelled some water, pushing a tiny bit of sand upward. This one can be tricky, as it can easily be mistaken for natural sand imperfections, but with practice, you'll start to recognize its distinct, often circular, nature.
The key is that these marks are distinct from the general texture of the beach. They are deliberate, often symmetrical indentations or rises, usually appearing in otherwise smooth, wet sand. You're looking for something that just doesn't quite fit with the random ripples and bumps.
Step-by-Step Guide to Identifying Razor Clam Holes
Alright, now that you know what you're looking for, let's talk about how to find them. This isn't just about walking and looking; there's a technique to it, a rhythm you'll develop, and a bit of patience required. Just like learning to read the water for fish, you're learning to read the sand for clams.
Scanning the Beach: The Visual Hunt
Your primary tool here is your eyes, but it's more than just a casual glance. You need to develop a keen eye for patterns and anomalies.
- Walk Slowly and Methodically: Don't rush. Walk at a deliberate pace, perhaps even a bit slower than your normal beach stroll. Your head should be down, eyes scanning the wet sand directly in front of you, but also a little wider. Think of it like looking for lost change on a sidewalk.
- Look for Contrasts: Razor clam "shows" stand out because they break the uniformity of the sand. Look for shadows, depressions, or small mounds that aren't part of the natural undulations left by the retreating tide. The best light conditions often involve indirect sunlight or overcast days, which reduce harsh shadows and glare, making subtle indentations easier to spot.
- Focus on the Tide Lines: Razor clams tend to be most active and, therefore, most visible in the damp, freshly exposed sand where the waves have just receded or are gently lapping. This area, known as the "surf line" or "wash zone," is where the clams are feeding, and thus, where their siphons are more likely to be up. Don't venture too far up the beach into dry sand, and conversely, be careful not to get caught by incoming waves if you're too close to the breaking surf.
- Work in Grids or Lanes: To ensure you don't miss anything, try working the beach in a systematic way. Walk in a straight line for a distance, then turn around and walk back parallel to your first path, overlapping slightly. This ensures comprehensive coverage and prevents you from mindlessly wandering past potential clam beds. This methodical approach is something I learned while trying to find coho in small coastal streams – patience and a pattern pay off! You might find that a good headlamp, like one you could find on Amazon, is crucial for early morning or late evening digs.
The "Stomp" or "Poke" Method
Sometimes, the "show" isn't immediately obvious, especially if the sand is a bit softer or more saturated. This is where you bring in the "stomp" or "poke" method to encourage the clams to reveal themselves.
- The "Stomp" Technique: This is a classic for a reason. Find a promising patch of sand in the intertidal zone, lift your foot, and stomp it down firmly. Don't just scuff; put some weight into it, trying to send vibrations through the sand. Wait a few seconds, perhaps up to 10-15 seconds. If there's a clam beneath, the pressure changes often cause it to squirt water up through its siphon, creating that tell-tale dimple. Sometimes it’s a tiny squirt, sometimes a more pronounced fountain. This method is particularly effective when the tide has been out for a while, and the clams have settled in deeper.
- The "Poke" Technique: An alternative or supplementary method is to use the handle of your clam gun or shovel, or even a sturdy stick. Gently poke the sand in an area where you suspect clams might be. Again, the idea is to create a slight disturbance or pressure change that encourages the clam to "show" itself. This can be more precise than stomping if you're working a smaller area or trying to confirm a very subtle hint of a clam.
Remember, both these methods rely on the clam reacting to a perceived threat or change in pressure. It's not a guaranteed "show" every time, but it significantly increases your chances, especially on days when the clams are being shy.
Timing is Everything: Tides and Conditions
Successfully finding razor clams isn't just about how you look, but when and where you look. The ocean is a dynamic place, and conditions can change rapidly.
- Negative Tides are Your Best Friend: Razor clamming is almost exclusively done during low tide, specifically during the lowest "negative" tides. A negative tide means the water level drops below the average low tide mark, exposing more of the clamming grounds. Check tide charts religiously before heading out. The ideal time to start looking is about an hour or two before the absolute lowest point of the tide, and you can continue digging for an hour or so after, as the tide begins to turn. You'll want to be on the beach before the lowest tide to get a jump on the exposed areas. For detailed tidal information, you'll want to consult local tide tables, easily found online.
- Calm Ocean, Less Surf: While you're often looking in the "surf line," excessively strong waves and turbulent conditions can make clamming very difficult and even dangerous. Heavy surf can scour the sand, making clam "shows" harder to see, and it can also fill in any visible holes quickly. Look for days with calmer ocean conditions. This also ties into safety; never turn your back on the ocean!
- Sand Consistency: The type of sand also plays a role. Razor clams prefer firm, fine-grained sand. On some beaches, parts of the sand can be too soft and silty, or too coarse and gravely. The "show" is typically most visible and distinct in the firm, wet sand that has been gently exposed by the receding tide. As the tide continues to go out, the sand may get firmer, making the dimples stand out more. It's truly an experience, and knowing the Best tide for razor clam digging can be your biggest advantage.
- Light Conditions: As mentioned earlier, overcast conditions or the soft light of early morning or late afternoon can make spotting subtle indentations much easier. Direct, harsh midday sun can create too much glare, making it challenging to differentiate a true clam show from random reflections or shadows.
Common Pitfalls and Look-Alikes
Even seasoned clam diggers can get fooled. The beach is full of interesting patterns and marks, and not every dimple or squiggle indicates a clam. Learning to differentiate is part of the experience.
Distinguishing Clam Holes from Other Beach Marks
This is where experience really comes into play, but I can give you a head start on what not to get excited about.
- Worm Castings and Tube Worm Holes: These are very common. You'll see tiny, often intricate mounds of sand or small holes that are clearly the work of marine worms. The key difference is that worm holes are generally much smaller and often have a more irregular shape compared to the distinct, symmetrical dimple or keyhole of a razor clam. Also, worm castings often have a "squirrely" or spaghetti-like appearance.
- Air Bubbles and Water Seepage: As the tide recedes, air trapped in the sand can escape, or water can seep up, creating small bubbles or temporary indentations. These often look more ephemeral and less structured than a clam show. They might dissipate quickly or simply look like a pocket of wet sand. A clam show tends to hold its form better.
- Footprints and Debris: Human and animal footprints, along with bits of shell, seaweed, or other debris, can create depressions or disturbances in the sand. These are usually much larger, more irregular, or clearly associated with the object that caused them. A true clam show is usually isolated and appears without any obvious external cause.
- Distinguishing from other shellfish: While the beaches are primarily known for razor clams, sometimes you might encounter other burrowing organisms. However, their 'show' is typically quite different. Razor clams have a very specific siphon shape. If you're unsure, try the stomp test. If it's not a razor clam, you likely won't get the same squirt. Knowing How to check red tide closures before clamming is crucial for any shellfish harvesting, so always check before you head out, no matter what you think you've found!
What to Do When You Can't Find Any "Show"
It happens to the best of us. You're on the beach, the tide is perfect, and… nothing. Don't despair! Here are a few strategies:
- Change Your Location: Razor clams aren't evenly distributed across the entire beach. Some areas are simply more productive than others. If you've walked a significant stretch and haven't seen anything, try moving a hundred yards or so down the beach, or even to an entirely different access point if practical. Different sand conditions or subtle underwater features can concentrate clams in specific spots.
- Wait and Observe: Sometimes, the clams are just taking their time to "wake up" and push their siphons to the surface. If you're early in the tide cycle, give it another 15-30 minutes. Find a spot, stand still, and just observe. Often, when you stop actively searching, a "show" will appear right in front of you.
- Intensify the Stomp/Poke: If visual scanning isn't working, lean heavily on the stomp or poke method. Cover more ground with a systematic stomping pattern. This is often the key to finding clams that are just a little deeper or less inclined to show themselves naturally.
- Ask Other Clammers (Polit-e-ly!): If there are other clam diggers on the beach, observe where they are having success. You don't need to crowd them, but seeing their general area of activity can give you a clue. Sometimes a friendly wave and a casual question (e.g., "Any luck today?") can lead to a helpful tip about a productive spot or what the clams are doing that day.
- Recheck Regulations: Sometimes, if you're not finding anything, it's not because you're a bad clammer, but because the season is closed, or there's a localized closure. Always check the official Oregon Department of Fish and Wildlife (ODFW) website for current regulations and health advisories before you leave home. This includes checking for paralytic shellfish poisoning (PSP) or domoic acid closures. There is a lot to know, and the Oregon Fishing Regulations Explained can be a great resource.
Maximizing Your Razor Clamming Success
Once you've mastered the art of spotting the "show," you're well on your way. But a few other considerations can make your trip even more enjoyable and productive.
Essential Gear and Preparations
Having the right tools for the job can make a huge difference in your comfort and success.
- Clam Gun or Shovel: This is non-negotiable. A good clam gun (a cylindrical tube you push into the sand) is often preferred for speed and efficiency, especially in soft sand. Clam shovels are also effective, particularly if you prefer a more traditional digging method or are in firmer sand. Practice using your chosen tool at home first, so you're not fumbling on the beach.
- Bucket or Net Bag: You'll need something to put your clams in! A bucket with a handle is classic, or a mesh net bag that allows sand and water to drain can be convenient. If you manage to hit the What is the daily limit for razor clams in Oregon you'll be glad you have a proper container.
- Waders or Waterproof Clothing: You'll be working in wet sand and potentially in shallow water. Waterproof waders or at least waterproof pants and boots are essential to stay dry and comfortable. The Oregon coast can be chilly, even on sunny days, so dress in layers.
- Gloves: Digging can be hard on your hands, and sometimes you might encounter broken shells. Waterproof gloves can protect your hands and keep them warmer.
- Headlamp or Flashlight: For early morning or late evening digs, especially during prime winter low tides, a good headlamp is indispensable. You can find excellent, waterproof options on Amazon.
- Measuring Device: Some clamming days have size limits, though razor clams usually only have a daily bag limit, not a size limit in Oregon. Still, it's good practice to have a measuring device for other species, or just to verify the size of your prize.
- Oregon Shellfish License: Absolutely crucial. You cannot legally harvest razor clams (or any shellfish) without the appropriate license. Make sure yours is current before you go. You can learn more about this by checking out the Oregon Shellfish License guide.
The Art of the Dig
Spotting the clam is half the battle; successfully extracting it is the other half. Razor clams are fast, and a bad dig can leave you with an empty hole and a frustrated sigh.
- Be Quick and Decisive: Once you see a "show" or a squirt, don't hesitate. Position your clam gun or shovel just slightly ocean-side of the visible hole. This is because the clam usually leans slightly towards the ocean.
- Clam Gun Technique: Push the clam gun straight down, centering the show within the tube. Push down as far as you can, then twist and pull up, bringing the sand (and hopefully the clam) with it. You might need to make a second, deeper plunge if the clam is particularly deep. Be ready to reach into the hole and grab the clam by its shell as soon as it's exposed, before it can burrow further.
- Shovel Technique: For shovels, quickly dig a wide, deep hole around the show, always keeping the clam's burrow in mind. The goal is to isolate the clam's burrow so you can reach it from the side. Again, be ready to grab the clam quickly. Many people dig a "hinge" on one side, allowing them to flip a large section of sand to expose the clam.
- Handle with Care: Razor clams have sharp edges. Be gentle when handling them to avoid cutting yourself or breaking the clam's shell. A broken shell means the clam won't survive, and that's a waste of a delicious meal.
- Re-fill Your Holes: It’s good clamming etiquette and helps preserve the beach for others. Always fill in your holes when you're done!
Razor clamming is one of those quintessential Oregon coastal experiences. It’s challenging, rewarding, and a fantastic way to connect with the natural world. By understanding the clam's behavior, honing your visual skills, and using the right techniques, you’ll be much more successful in spotting those elusive clam holes and bringing home a tasty harvest. Happy clamming, my friends!
Disclaimer
This article is for general informational purposes only and does not constitute professional advice. Laws, prices and regulations vary by location and change over time. Consult a qualified professional for guidance on your specific situation.